I am paranoid about backups. Computers running Windows can simply "go bad", based on my experience. As a result, I make backups weekly.
Windows itself is not a stable OS. Under Windows 98, I wiped out the data and re-installed EVERYTHING from scratch every 6-12 months. Under Windows XP, I did not experience any flakiness until 24 months from my initial installation.
To back up all the machines on my network, I use removable hard drives on a networked computer. I rotate the backups each week, as I move them to off-site storage. The machine that actually houses the removable drives is running Windows 2000. Windows 2000 was far more reliable than Windows 98 when I set up this system of backups.
I bought inexpensive hard drive "trays", and "naked" hard drives. I started with two 20 GB drives, then graduated to 40 GB drives. When one of those drives failed, I decided to move up to two IBM Deskstar 60GXP drives (60 GB), which is what I am currently using for backups. I have since had one of those drives fail, and got a replacement drive from IBM.
One annoyance is that, each time I swapped the removable drives, I had to go through several manual steps (the drive trays are not hot-swappable units). When the system boots up the first time, it eventually informs me that it sees a new hard drive, and forces me to reboot.
I had set up drive letters, and share names for about 15 partitions on the removable drive. Three different computers access these shares (via mapped network drives) for backup purposes. After restarting Windows, all of my drive letters were incorrectly assigned. I had to manually re-establish the "correct" drive letter for each share. This was a very tedious procedure, and I had to do it EVERY week.
I researched ways to automate the assignment of the share names, but didn't like what I found. But I discovered an idea that turned out to be the final solution to my problem.
You can change the drive letter assignments in Windows XP using Control Panel / Administrative Tools / Computer Management / Disk Management. Right click on the volume name (in the right half of the window), and choose "Change drive letter and paths". If there is no drive letter assigned, then click "Add". In the next dialog, you will have a choice to either assign a drive letter, or to mount the drive in an empty NTFS folder.
This last option turns out to be VERY useful! I now have network share names without having a drive letter assigned. I no longer have to deal with the drive letters getting messed up each time that I swap the removable drives.
EXAMPLE - Mount in empty NTFS Folder
If you create an empty folder on an NTFS drive, you can access the drive without assigning a drive letter. Here is an example, using the XP_Clean partition on my laptop:
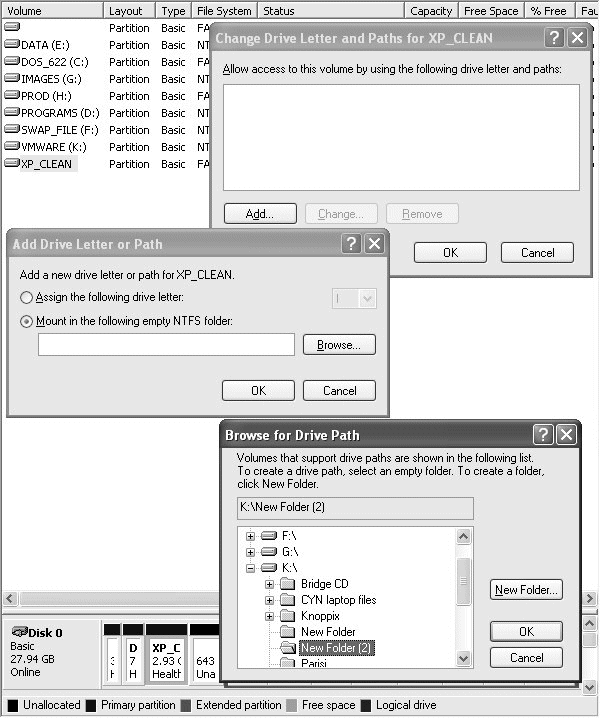
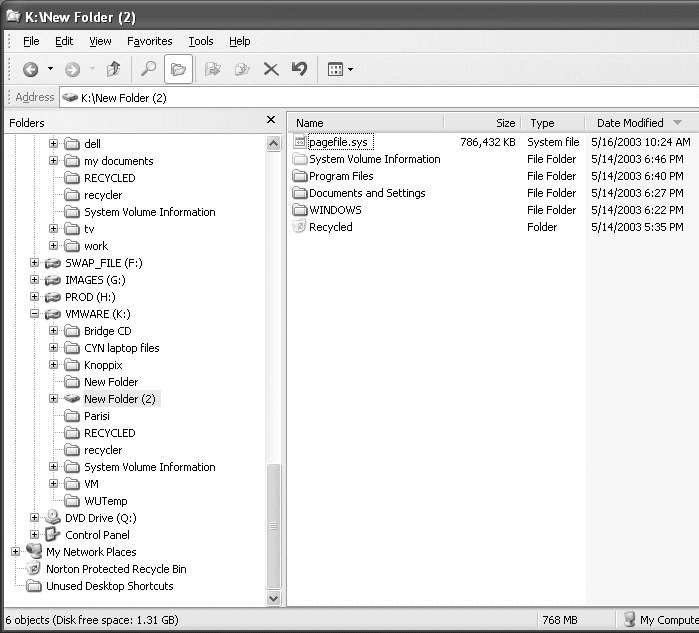
The bottom of the image shows that I created a new folder on drive K that is now linked to the XP_Clean partition. In Windows Explorer, that folder appears with the icon for a disk drive. As shown below, the root for the XP_Clean drive is what appears as the contents of that folder:
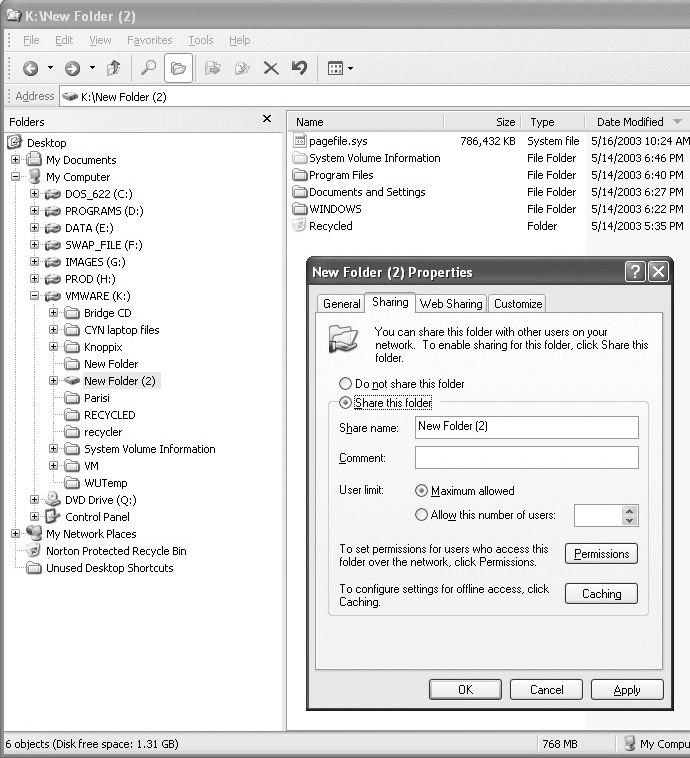
At this point, the XP_Clean drive is not accessible from other computers on the network. I still need to define a share name. To do that, right click on the folder name, and choose "Sharing and Security" from the context menu. Then click on "Share this folder", and specify the name you want to use:
Using removable Drives
Now, back to the setup on the "backup PC". I had to mount EACH of the partitions of both removable drives in an empty NTFS folder. I created a dummy NTFS partition (G:) solely for this purpose. Here is what the fixed (Disk 0) and removable (Disk 1) drives look like using Computer Management / Disk Management:
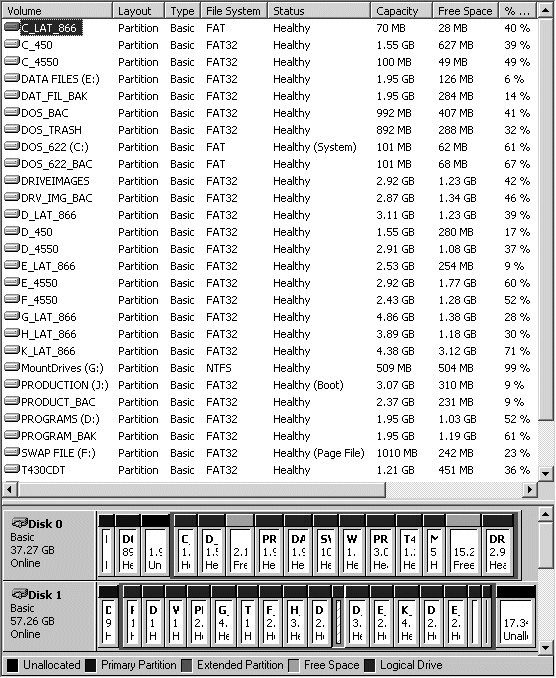
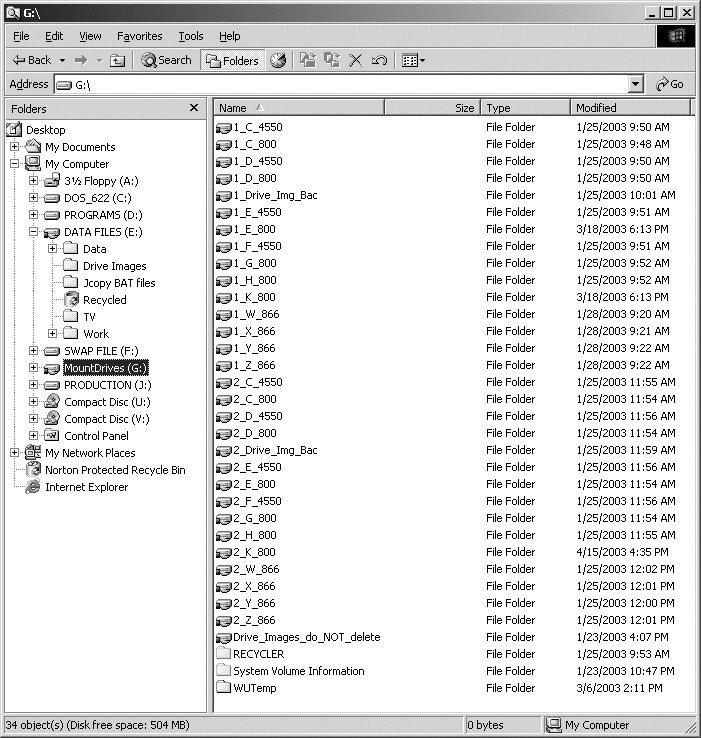
Many of the partitions have no drive letter assigned. These partitions were all mounted in folders on drive G, which is formatted with NTFS. There are two sets of folders on drive G, one for each of the two removable drives:
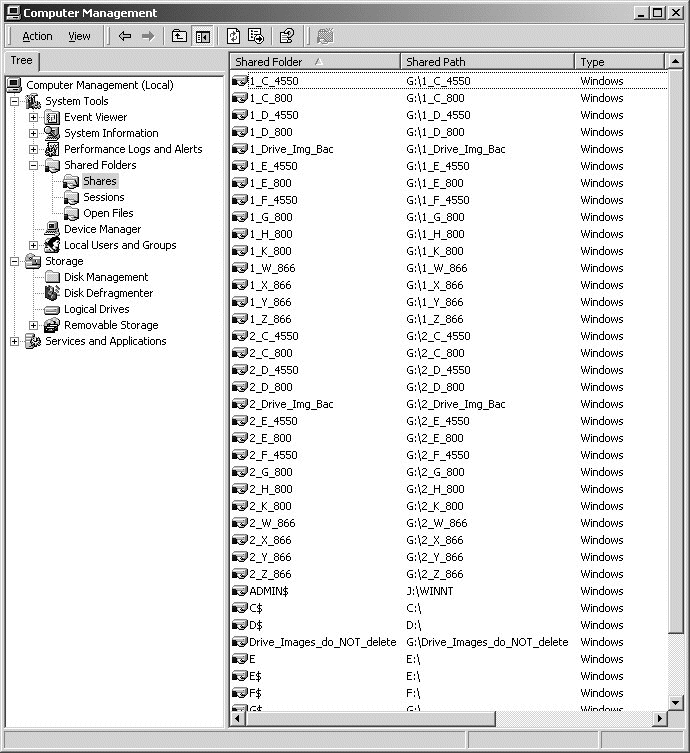
For each partition (mounted in a folder) that would be accessed by another computer on the network, I had to assign the share name. The share names mirrored the folder names on drive G. There are two sets of shares, one for each of the two removable drives:
I set up a series of batch files on each computer. The removable drives are numbered 1 and 2, so I had a different batch file to map the shares for each one. When I run Jcopy each week, here are the steps I follow:
1. Run ERUNT to back up the registry
2. Run 1Net_use.cmd (or 2Net_use.cmd) to map the shares on
the remote computer to drive letters on the local computer
3. Run Jcopy to back up the local computer
4. Run Net_del.cmd to delete the mapped drive letters
Here are the various batch files, and the Jcopy.ini file:
Contents of 1Net_use.cmd
REM **
REM ** Use this one with Removable Drive #1
REM **
net use u: \\dell866\1_C_800
net use v: \\dell866\1_D_800
net use w: \\dell866\1_E_800
net use x: \\dell866\1_G_800
net use y: \\dell866\1_H_800
net use z: \\dell866\1_K_800
Contents of 2Net_use.cmd
REM **
REM ** Use this one with Removable Drive #2
REM **
net use u: \\dell866\2_C_800
net use v: \\dell866\2_D_800
net use w: \\dell866\2_E_800
net use x: \\dell866\2_G_800
net use y: \\dell866\2_H_800
net use z: \\dell866\2_K_800
Contents of Net_del.cmd
net use u: /delete
net use v: /delete
net use w: /delete
net use x: /delete
net use y: /delete
net use z: /delete
Contents of Jcopy.ini
[Backup all Drives]
C:\ U:\
subdirs
D:\
V:\ subdirs
E:\
W:\ subdirs
G:\ X:\
subdirs
H:\ Y:\
subdirs
K:\ Z:\
subdirs
[C only]
C:\ U:\
subdirs
[D only]
D:\
V:\ subdirs
[E only]
E:\
W:\ subdirs
[G only]
G:\ X:\
subdirs
[H only]
H:\ Y:\
subdirs
[K only]
K:\ Z:\
subdirs
The Jcopy.ini file is set up so that I can back up the drives individually, or all at one time. I often run two or three instances of Jcopy, and back up an individual drive with each instance.
Last modified: November 28, 2011